A pressing issue for many family budgets is the question of a cheap, satisfying and tasty dish that can be quickly prepared and not embarrassingly served to dear guests with the most refined taste and high demands on food. The “royal” baked lard, proposed for preparation in this article, meets all these criteria. The product is not only appetizing, soft as butter, and nutritious, but also quite cheap by market standards.
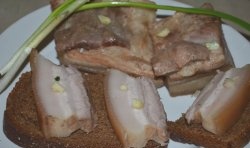
We use this lard instead of factory-made sausages in sandwiches, or as an addition to first or second courses. Royal lard is completely natural and has high nutritional value.
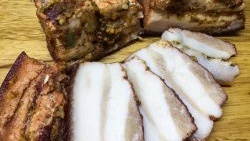
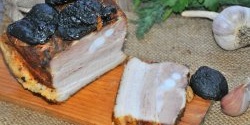
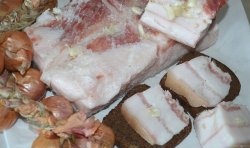
To prepare lard, take a piece of fatty pork from the side or peritoneum. Using any part of the lard, skinned or skinless, generally does not affect the overall flavor of the finished product. It all depends on personal preference. If the presence of the skin is considered inappropriate, it can be easily removed after the dish is removed from the oven and has cooled slightly.If there are no prejudices against pork skin, you can leave it, because after cooking and cooling, it becomes soft and quite edible.
Advice. To prevent the lard from completely melting, it must be with the meat. However, it is better not to cook boiled pork type meat according to this recipe. In this case, there is an increased likelihood that the final product will be tougher than desired and overly salty.
Ingredients:
- lard with meat layers – 700-1000 grams;
- salt – 1-2 teaspoons;
- mixture of peppers (ground black and red) – 10 grams;
- garlic – 7-8 cloves;
- bay leaf – 1-2 pieces;
- baking sleeve or foil.

Step-by-step recipe for cooking lard in the oven
Step 1.
Prepare a mixture of peppers and salt. Chop the peeled garlic into small pieces or strips. We stuff the pre-selected piece of lard with salt, then peppers and garlic. If the lard has skin, then pierce it from the meat part to the skin and pour spices into each puncture using the tip of a knife.

Advice. The more often we make punctures, the tastier the dish turns out. It is better to take a knife with a rounded end to make it easier to pick up spices. For these purposes, a regular Soviet table knife is better suited. But with practice, you can use any sharp knife.
Having stuffed the entire piece in sequence, add a little salt on all sides, rub it with the remaining pepper and leave to marinate for an hour. If there is no free time, then skip the marinating.
Advice. It can be difficult to calculate the amount of pepper and salt that will be needed for a particular piece of lard. In this case, remove the excess dry spices into a separate jar and use them the next time you refer to the recipe.
Step 2.
We pack the product in a baking sleeve, not forgetting to first put a bay leaf on top so that it imparts its smell to the finished dish.

Advice. If you don’t have a sleeve at hand, use foil and a frying pan so that the melted lard does not leak out and burn during cooking.
Step 3.
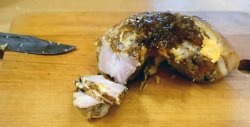
Place the prepared semi-finished product in a cold oven and bake for 20 minutes at 200 degrees. Then reduce the heat to 120 degrees and bake for another 20 minutes. After turning off the oven, let the dish stand there until it cools completely to room temperature, and then store it in the refrigerator.
Advice. When the lard is baked, carefully pour the melted fat into a separate bowl and use it as an additive for porridge or potato dishes. At the same time, it is important to control how salty the liquid is, so as not to oversalt the finished product.
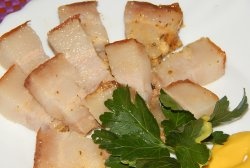
As a result, with minimal expenditure of money and time, we get a dish that is guaranteed to become a worthy decoration for any table, which will be clear even when it begins to emit a very appetizing smell during the baking process. It is advisable to serve our “royal” lard after cooling and eat it with mustard.