Do it yourself
Life hacks, master classes, useful tips, recipes.
home » Handicraft techniques » Decor » Wall decor » Painting made from cocktail straws
Cocktail straws are a very fertile material for creativity. They are easy to bend, cut and stick quickly. And if after many holidays you have accumulated a sufficient number of plastic straws, then you can get creative and find an unusual use for them. For example, glue them around a half-liter jar, tie them with a bow and you will get an excellent vase for a bouquet of flowers. If you cut the straws 3-4 cm long and string them on a thread, you will get an original decoration (beads and bracelets) for your daughter. You can use this method to glue a frame for a photo from a party, make extraordinary Christmas tree decorations and other tricks. Today we offer you a step-by-step master class on how to make a simple painting of flowers, made from sections of cocktail straws.

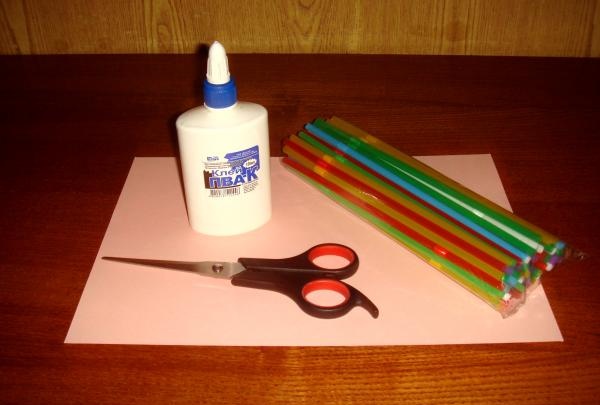
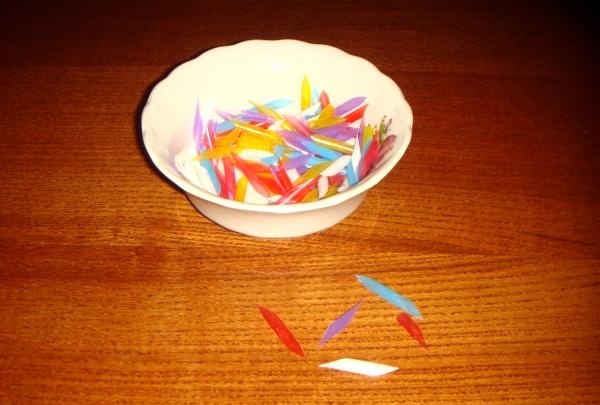
Prepare for crafts such materials:
- a sheet of cardboard that is not too bright in color (in the photo it is pale pink);
- scissors that cut well;
- a tube of PVA glue;
- cocktail straws, two of each color: green, white, blue, red, yellow, purple.

Painting made from cocktail straws


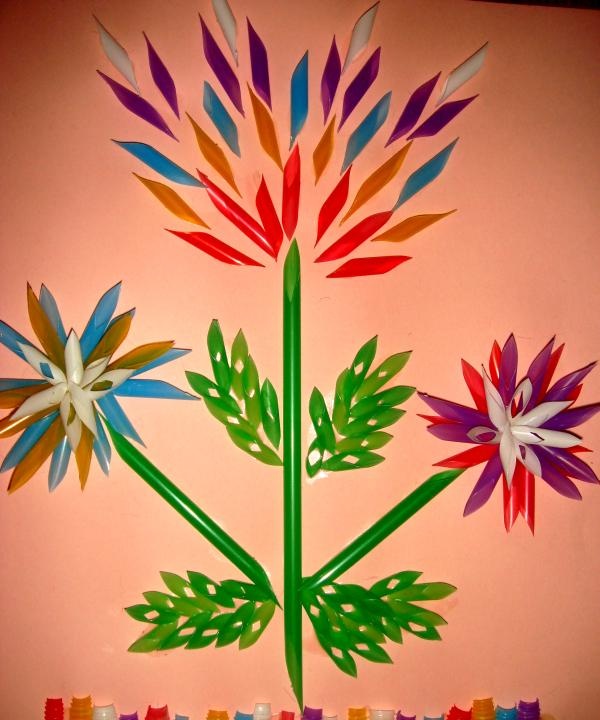
So, each tube must be cut into pieces of 1 cm, 1.5 cm and 0.5 cm.You just need to make not an even cut, but an oblique one. Those fragments that consist of an “accordion” should be cut lengthwise into 4 parts and stretched. Cut the green straws like this: one 8 cm long and two 6 cm long.

Painting made from cocktail straws


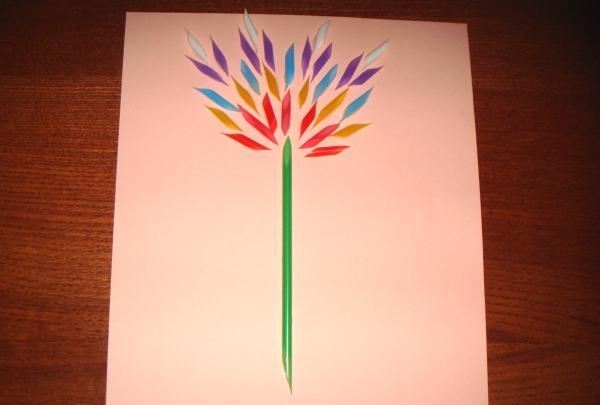
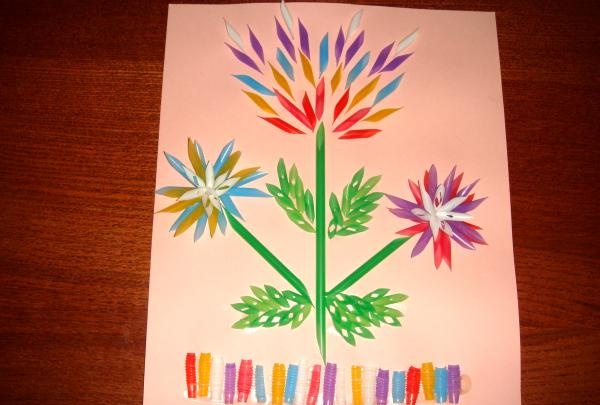
Now turn on all your creativity, use your imagination and come up with the outlines of the future flower. If it is difficult for you to keep the picture in memory, then you can carefully draw the image on the sheet, only with light touches of a simple pencil. Start with the stem (the longest green section) and place it in the middle of the leaf. The straws easily adhere to PVA glue. Gradually glue colored pieces of straws on top of the stem. For example, 7 red pieces, 6 yellow ones between them, then a row of purple and blue ones, and glue the topmost white petals.

Painting made from cocktail straws


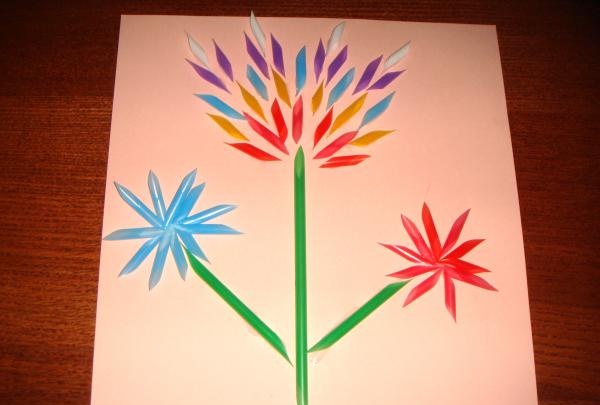
Then, from the main stem, place two secondary stems (6 cm sections) on the sides. On the right, form a red bud from 10 segments, and on the left there will be a blue flower (11 pieces of petals).

Painting made from cocktail straws


While the petals of the small buds are drying, lay out and glue 4 green leaves. For them, you need to cut the green tube into pieces 0.5 cm wide. It is better to place them behind the round hole. The leaves can be of different shapes and sizes, but they will all look beautiful and all have the same shape.

Painting made from cocktail straws


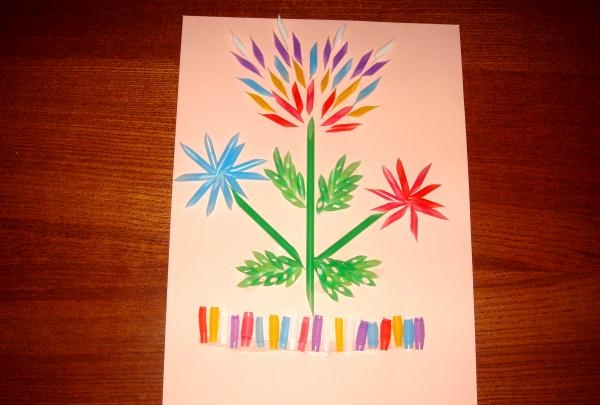
Then you can form a decorative “grass” at the bottom from those parts of the tubes where there is an accordion. It will look more expressive if you alternate colors. At this stage it is necessary to make the small side flowers more magnificent. It is better to glue purple petals onto red ones, and blue petals go well with yellow ones. In the very center of the flower, glue white pieces measuring 0.5 cm - this will be the center of the flower.

Painting made from cocktail straws


This is such an original picture obtained from cocktail tubes. All that remains is to put the work in a frame, hang it on the wall and admire the creation of your hands. Bright multi-colored butterflies and dragonflies are excellently made from pieces of cocktail straws.

Painting made from cocktail straws
come back
Comment
  • bowtiesmilelaughingblushsmileyrelaxed relaxedsmirk
    heart_eyeskissing_heartkissing_closed_eyesflushedrelievedsatisfiedgrin
    winkstuck_out_tongue_winking_eyestuck_out_tongue_closed_eyesgrinningkissingstuck_out_tonguesleeping
    worriedfrowninganguishedopen_mouthgrimacingconfusedhushed
    expressionlessunamusedsweat_smilesweatdisappointed_relievedwearypassive
    disappointedconfoundedfearfulcold_sweatperseverecrysob
    joyastonishedscreamtired_faceangryragetriumph
    sleepyyummasksunglassesdizzy_faceimpsmiling_imp
    neutral_faceno_mouthinnocent
4 minus one =
Comments (0)

5 electronic homemade products without transistors and microcircuits

Multimedia projector | Do it yourself

Anti-aging ice cubes for oily and normal skin | Do it yourself

7 ideas for using broken things in new ways with your own hands

«Do it yourself - with your own hands» - a site of interesting homemade products made from scrap materials and items at home. Step-by-step master classes with photos and descriptions, technologies, life hacks - everything a real master or just a craftsman needs for needlework. Crafts of any complexity, a large selection of directions and ideas for creativity.

We recommend reading

Washing machine error codes