Do it yourself
Life hacks, master classes, useful tips, recipes.
home » Different » Crafts » New Year's crafts » New Year cards made from kraft paper
Our leap year 2016 is coming to an end, and the Year of the Cockerel, 2017, is soon ahead of us. A sea of ​​emotions, positivity, gifts, New Year's miracles, a beautiful visiting Christmas tree, all this awaits us with the arrival of the New Year holidays. New Year is perhaps the most favorite holiday of absolutely all people, both kids and adults enjoy it. Agree, it’s very nice, after the hard and difficult everyday life that accompanied us day after day throughout 2016, to finally get some kind of gift from under the New Year’s tree, even if it’s a small one, but it’s damn nice and always unexpected. Any holiday does not pass by without congratulations and wishes, which we always write in greeting cards. Nowadays, handmade cards and souvenirs are becoming very beautiful and quite popular. This is perhaps the most pleasant thing you can get for the New Year, since it is on such a postcard that you can transfer the magic that we want to see in our home.
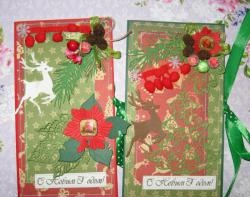
So, now we will make two beautiful New Year cards, but we will have them without any beautiful and bright paper, and the base will be the most ordinary craft paper.

For the master class we take:
• Marble cardboard, white and gray combination, two landscape sheets;
• Kraft paper, two sheets 20*30 cm;
• Burlap;
• Brown ribbon with pompoms;
• Stamped inscriptions “Happy New Year”;
• New Year's cuttings: deer, snowflakes, wishes in brown, gray;
• Cutting out white leaves of different shapes;
• For decoration we take: alder cones, white and silver berries in sugar, a heart in silver glitter, white and silver twigs, ribbons, bells;
• Leg-split;
• Watercolor paper;
• Ink pad;
• Acrylic snowflakes;
• Chipboards snowflakes;
• Napkins cut out of craft paper;
• Chameleon rhinestones;
• Double-sided tape and “Glass effect” glue;
• Ruler, pencil, scissors;
• Dry white glitter.
New Year cards

New Year cards

So, first we need to make two bases for our postcards from marble cardboard. One blank will be vertical, and the second horizontal. The vertical base is 10.5 by 19 cm, and the horizontal base is 10 by 21 cm.
New Year cards

New Year cards

We cut out the blanks, fold them and get the basics.
New Year cards

New Year cards

For the inscription we need to cut out two rectangles 9.5 by 20.5 cm and 10 by 18.5 cm.
New Year cards

New Year cards

Along the edges of both watercolor rectangles we tint with a pillow. Now we glue both watercolor rectangles onto the inside of the bases with double-sided tape.
New Year cards

New Year cards

Take craft paper and cut out two rectangles for each card, and also cut out two more narrow rectangles for the front design. We cut out two strips of burlap, tint two inscriptions, and take two more craft napkins.
New Year cards

New Year cards

We glue the burlap, then put a strip of kraft paper on it, sew it on, then sew the inscription below. Now we glue the prepared craft parts to the card bases on the front and back.
New Year cards

New Year cards

We sew both front and back edges.Now we need to decorate our cards as little as possible.
New Year cards

New Year cards

We paste the decorations like this. Now we put dots in different places with glass effect glue, and then sprinkle with glitter.
New Year cards

New Year cards

The glitter dries on the glue, a sparkle appears on the cards and you're done. You can write congratulations and make your loved ones happy. Thank you for your attention! Bye bye.
New Year cards

New Year cards
come back
Comment
  • bowtiesmilelaughingblushsmileyrelaxed relaxedsmirk
    heart_eyeskissing_heartkissing_closed_eyesflushedrelievedsatisfiedgrin
    winkstuck_out_tongue_winking_eyestuck_out_tongue_closed_eyesgrinningkissingstuck_out_tonguesleeping
    worriedfrowninganguishedopen_mouthgrimacingconfusedhushed
    expressionlessunamusedsweat_smilesweatdisappointed_relievedwearypassive
    disappointedconfoundedfearfulcold_sweatperseverecrysob
    joyastonishedscreamtired_faceangryragetriumph
    sleepyyummasksunglassesdizzy_faceimpsmiling_imp
    neutral_faceno_mouthinnocent
4 minus one =
Comments (0)

Installation of suspended ceiling | Do it yourself

Chicken breast ham

How to make a half-bridge converter with TDKS

Making your own ironing board | Do it yourself

«Do it yourself - with your own hands» - a site of interesting homemade products made from scrap materials and items at home. Step-by-step master classes with photos and descriptions, technologies, life hacks - everything a real master or just a craftsman needs for needlework. Crafts of any complexity, a large selection of directions and ideas for creativity.

We recommend reading

Washing machine error codes