Content
- 1. Types of barbecues.
- 2. What fuel should I use?
- 3. Fuel consumption.
- 3. How to light a barbecue with wood and coal.
- 4. Tools and materials.
- 5. Outdoor grill made of metal.
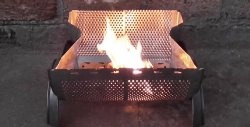
Brazier - This is an open-type stove that burns wood and coal. Thanks to this device, you can prepare such a tasty and aromatic dish as kebab. The article will provide information about various models of braziers, the type and consumption of fuel used, methods of igniting wood, coal, and the manufacture of a classic oven model with different levels of skewers.
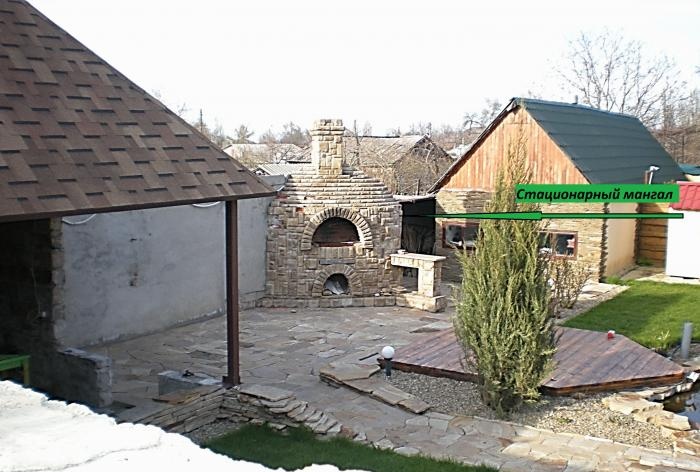
Types of barbecues.
The simplest grill can be made from bricks or stones. If there is no stone material, a hole is dug in the ground, and branches are laid along the edges to support the skewers. The common design of a fryer consists of metal sheets connected to each other into a rectangular box by welding or detachable fasteners.
Braziers are divided depending on:
- - materials used for earth, stone and metal;
- - sizes for portable (mobile, not collapsible) and stationary;
- - energy sources for solid fuel, electric and gas.
What fuel should I use?
To ensure the intensity of thermal radiation and smoke purity, it is necessary to use the following types of fuel:
1. Dry branches, trunks of fruit trees, oak, beech, acacia. Due to the high concentration of carcinogens released during the combustion process, it is undesirable to use dry material from coniferous trees and birch.
2. Charcoal. Made from birch and oak, apple and cherry. Low quality coal is also sold, which is made from pine or aspen. The main difference between a quality product is that it is dense, heavy and has a rich anthracite color (charcoal black with a gray sheen).
3. Coal briquettes. This product is obtained from hardwood coal by grinding, mixing with natural starch and pressing into briquettes. Densely packaged products have a specific caliber that allows you to accurately determine fuel consumption for different quantities of cooked meat.
Fuel consumption.
Fuel consumption depends on the weight and type of product being prepared, wind direction and speed, ambient temperature, barbecue characteristics, and wood quality. Since there are many variables on which wood consumption depends, let’s consider how much fuel is needed for the presented model.
The grill is placed outside near a wall that protects the fire from the wind. The process occurs at a temperature of about 20 degrees Celsius. If this:
- - 1 kg of pig meat (shish kebab) or fish, then the product will be cooked in 15 - 20 minutes, and the average fuel consumption for firewood / coal / durum briquettes is 2.5 / 1 / 1 kg;
- - 1 kg of chicken legs, then it will take 25 - 35 minutes to prepare the dish.in this case, the average fuel consumption will be 3.5 / 1.5 / 1.5 kg.
Data were collected during 12 experiments from May to June.
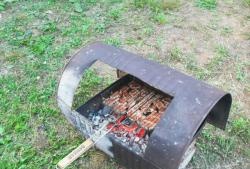
How to light a barbecue with wood and coal.
It is very easy to prepare charcoal from firewood in a barbecue. It is much more difficult to light a fire after the stove has been out in the pouring rain. To ignite fuel in a wet barbecue, you can proceed as follows:
1. Prepare dry branches and logs in the required quantity to prepare the required amount of food.
2. Place 3-4 logs from the prepared ones in one layer on the wet bottom of the roasting pan.
3. Place crumpled paper in any shape on the resulting wooden base and place thin chips, branches, and then logs of medium thickness on it in the form of a cone.
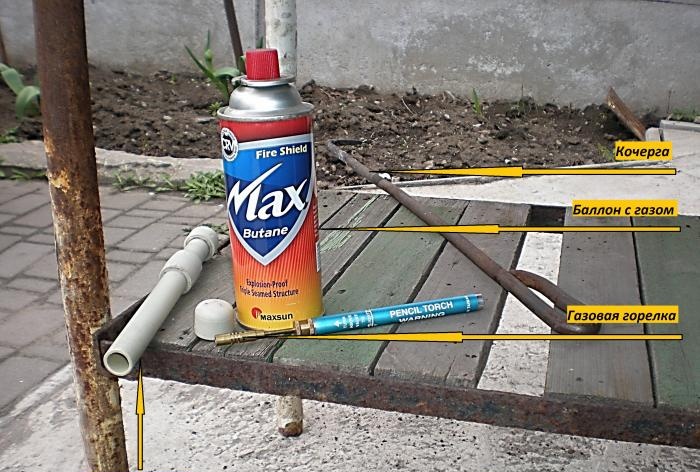
4. Use matches or a gas torch to set the paper on fire.
5. After an intense flame appears, lay down the rest of the prepared wooden material and wait for the coal to appear.
Ignition of finished coal or briquettes can be done using the following technology:
1. Empty enough fuel from the bag.
2. When using coal, chop it into equal pieces.
3. Moisten the fuel generously and evenly with charcoal lighter fluid. For these purposes, it is advisable to use a paraffin-based product or the head of moonshine, since these liquids do not emit a specific odor during the combustion process.
4. After 60 - 90 seconds, the treated fuel can be ignited. Waiting for the specified period of time is necessary for the product to be absorbed into the wooden base.
5. Using a fan, which can be made from thick cardboard, create an intense combustion.
6. After the appearance of powerful thermal radiation, food can be placed on the grill.
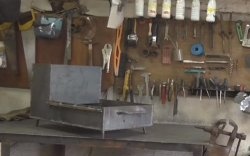
Tools and materials.
To make a metal barbecue for the street you will need the following tools and material:
- drill with metal drills with a diameter of 6, 10, 12 mm;
- grinder with cutting wheel;
- wood hacksaw;
- wrenches 10 – 12 mm;
- tape measure and pencil;
- 90 degree square;
- metal sheet measuring 600 X 1015 mm;
- corner 45 X 45 mm, length 120 mm;
- corner 35 X 35 mm – 5900 mm;
- corner 25 X 25 mm – 2100 mm;
- pipe with a cross-section of 3/4" – 3 m;
- rod with a diameter of 8 mm and a length of 700 mm – 2 pcs.;
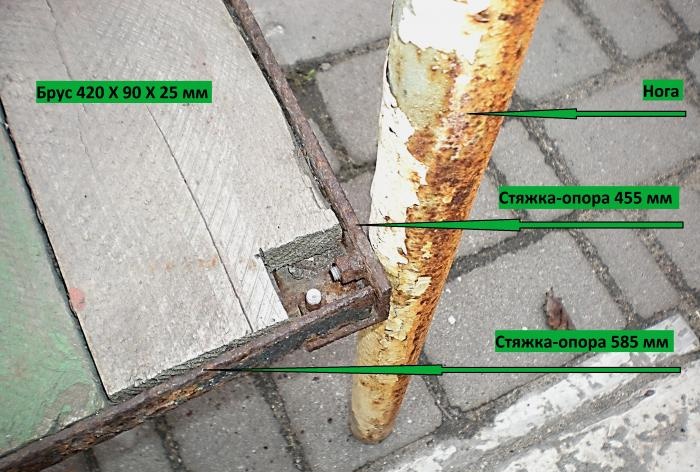
- board 70 X 25 mm – 3.4 m;
- bolt with nut 40 X 6 mm in the amount of 30 pieces;
- self-tapping screw 20 X 3.5 mm – 14 pcs.
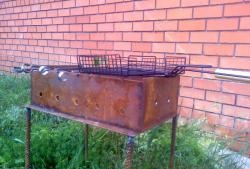
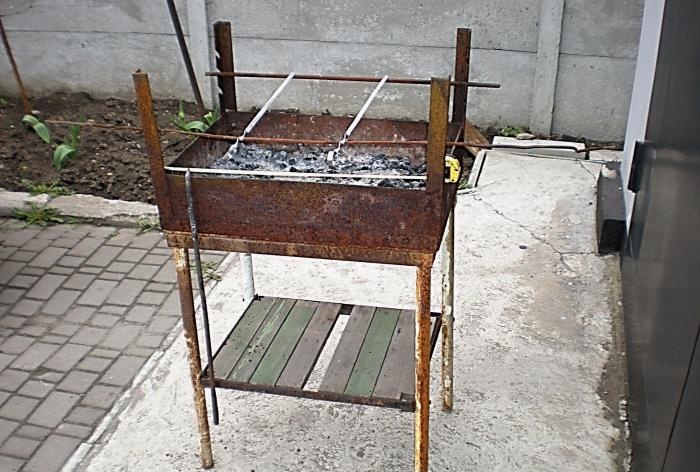
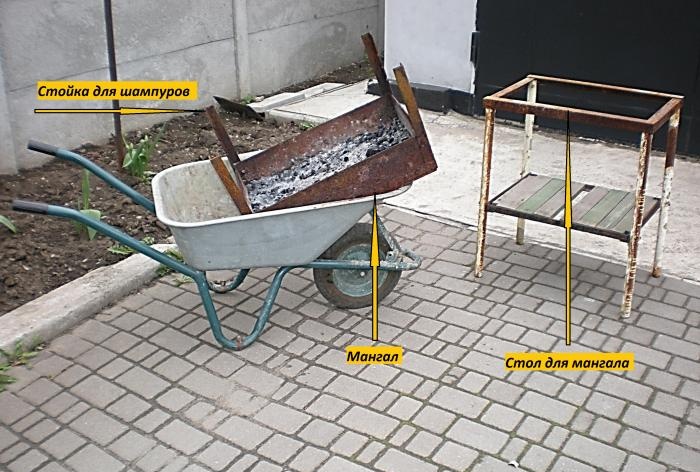
Outdoor grill made of metal
The process of manufacturing a multi-level barbecue will take place in the following stages:
Stage No. 1.
Mark the prepared materials and cut them with a grinder from:
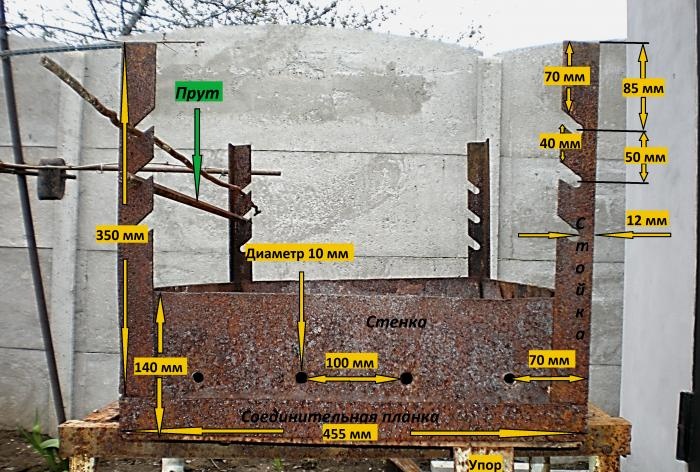
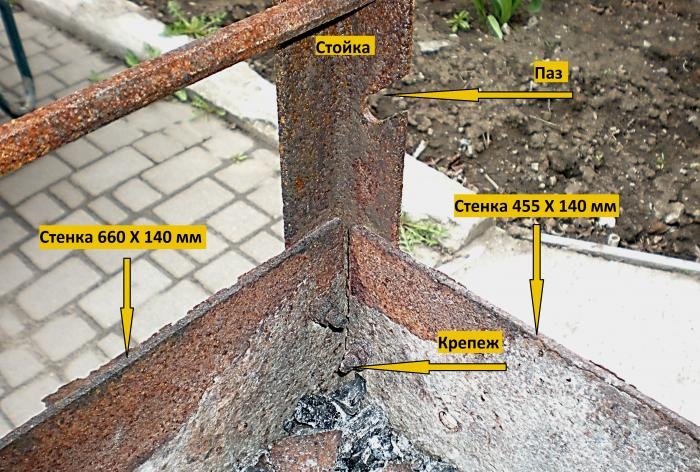
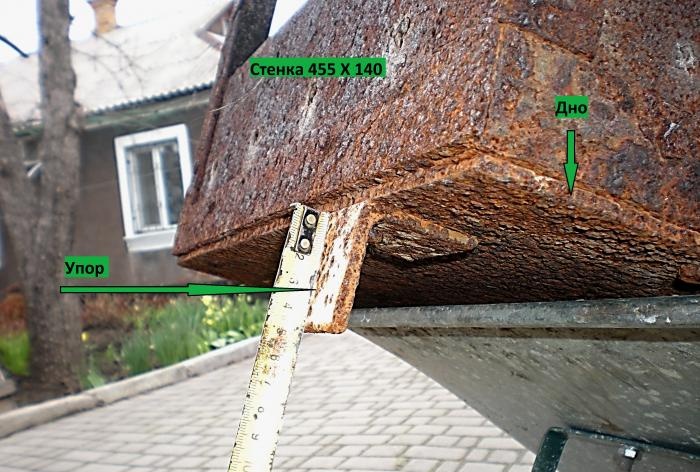
- metal sheet side walls with dimensions 660 X 140 mm – 2 pcs., 455 X 140 mm – 2 pcs., 660 X 455 – 1 pc.;
- corners 45 X 45, two stops of equal length;
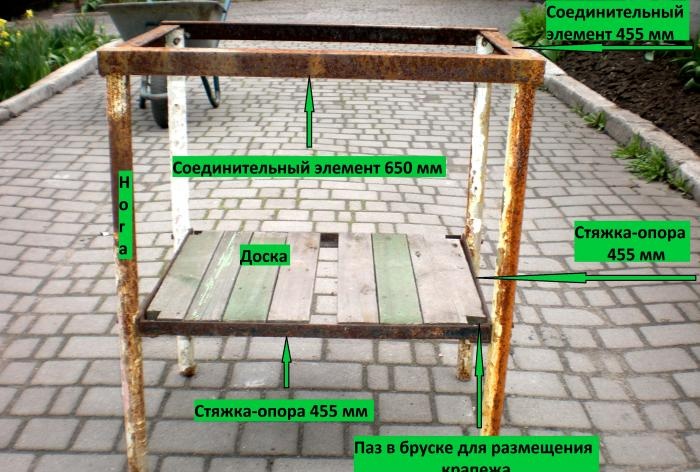
- corner 35 X 35, four stands for skewers, 350 mm each, lower connecting elements for a barbecue 660 mm long - 2 pcs., 455 mm - 2 pcs., and a table 650 mm - 2 pcs., 455 mm - 2 pcs.;
- corner 25 X 25 support ties 585 mm – 2 pcs., 455 mm – 2 pcs.;
- 3/4" pipes, four legs, 750 mm each.
Saw the board into seven bars 420 mm long.
When cutting all parts, it is necessary to take into account the cutting width of about 2 mm.
Stage No. 2.
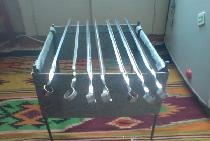
On the racks from the 35 X 35 corner according to the photo, make markings to obtain racks with right-sided (2 pcs.) and left-sided (2 pcs.) placement of grooves. Use a 12 mm drill to drill holes and use a grinder to cut out the grooves for the skewers.
Stage No. 3.
In the two lower connecting elements for the roasting pan (35 X 35 X 660 mm), cut a groove along the edges of one strip to fit the 35 X 35 X 455 mm corners flush.
Stage No. 4.
Using bolts, attach the connecting elements to the side walls of the grill.
Stage No. 5.
Attach the bottom to the resulting frame with bolts.
Stage No. 6.
Mount racks for skewers to the formed box in the corners so that the grooves are directed along the width of the grill.
Stage No. 7.
Attach the stops to the extreme part of the bottom with bolts.
Stage No. 8.
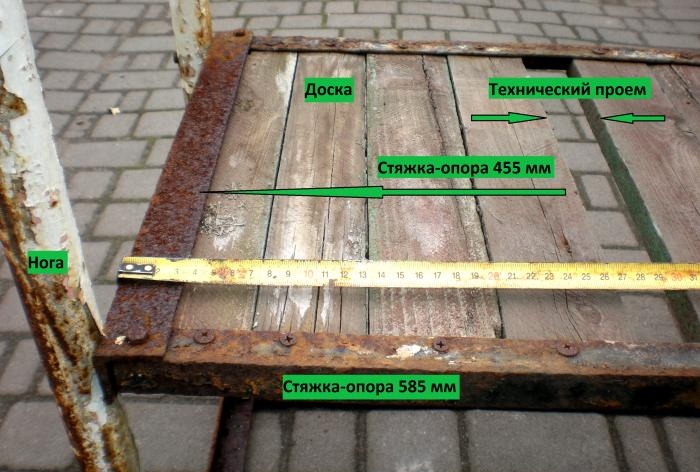
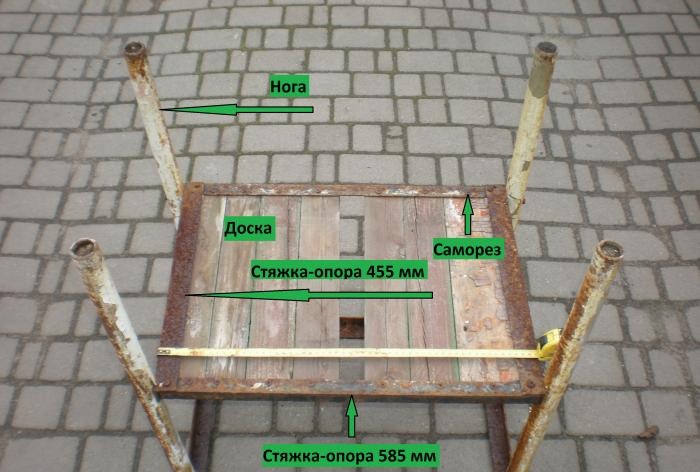
Attach one support tie, 455 mm long, to a pair of table legs. Tighten the four legs with a 585 mm support tie.
Stage No. 9.
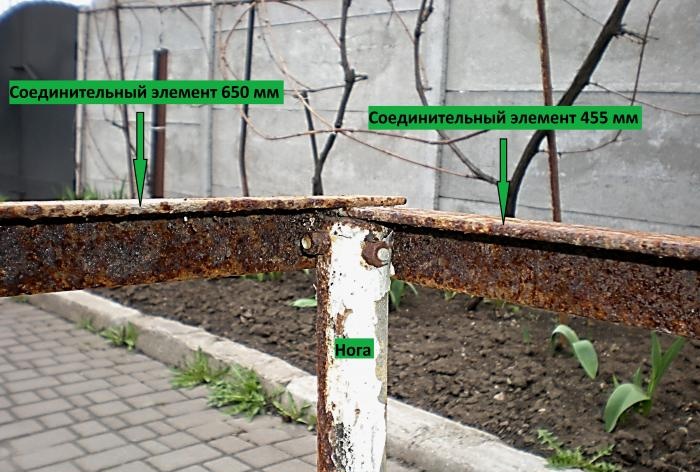
At the top of the legs around the perimeter, install connecting elements from a 35 X 35 angle.
Stage No. 10.
On the back side of the support tie at 585 mm, drill holes for attaching the board.
Stage No. 11.
Cut a groove in two wooden blocks along the edges to accommodate the fasteners for support ties.
Stage No. 12.
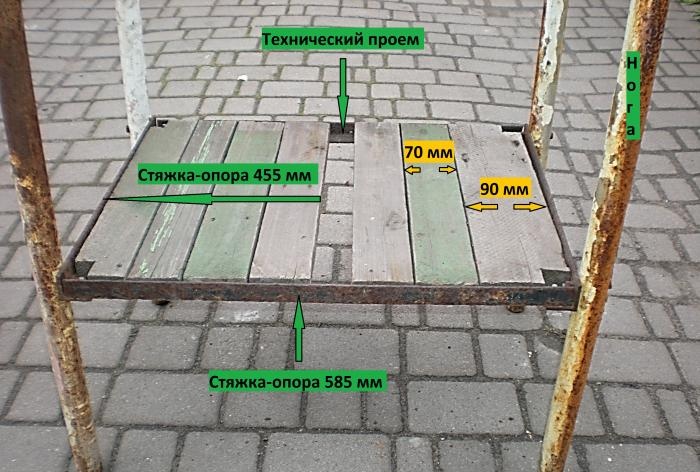
Place the bars with grooves along the edges of the table shelf and secure them with self-tapping screws. Fill and fix the remaining boards of the shelf in such a way that a technical opening is formed in the middle, facilitating comfortable maintenance of the site.

Stage No. 13.
Place the grill on the table, mark the holes in the middle of the walls of the grill at the distance indicated in photos 5 and 14.
Stage No. 14.
In the wall of the roasting pan measuring 660 X 140 mm, make holes with a diameter of 6 mm (12 pcs. in total), and in the wall 455 X 140 mm - 10 mm (8 pcs. in total).
The portable metal grill is assembled and ready for testing.