In cities where water supply is scheduled, residents try to install a backup water tank with an automatic pumping station at home. It provides people with water when there is no water in the central pipeline.
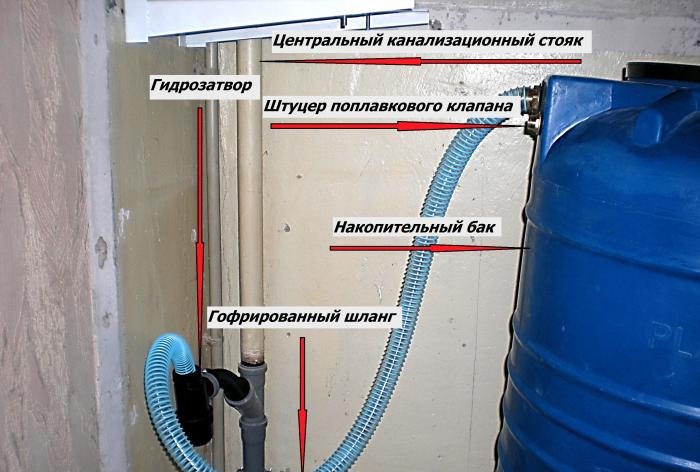
But the storage system has a significant drawback - the tank poses a potential threat to the neighbors of the lower floor. For example, if the float valve, which is used to accumulate liquid in the tank, is leaking, and in the absence of an emergency drain, it will overfill, and the excess water will flood the neighbors. Therefore, in order to prevent such situations, the tank must be equipped with an emergency drain, which is usually connected to the central sewerage system through a water seal.
If you do not provide the overflow system with a hydraulic shutter, the foul odor from the sewer will penetrate into the room.
There are practically no standard overflow systems that would be directly designed for high-quality connection with a storage tank.Therefore, many craftsmen are beginning to come up with a reliable and practical drain from a wide range of plumbing products. The article presents an option for installing a compact and sealed emergency drain for a storage tank.
What does it consist of?
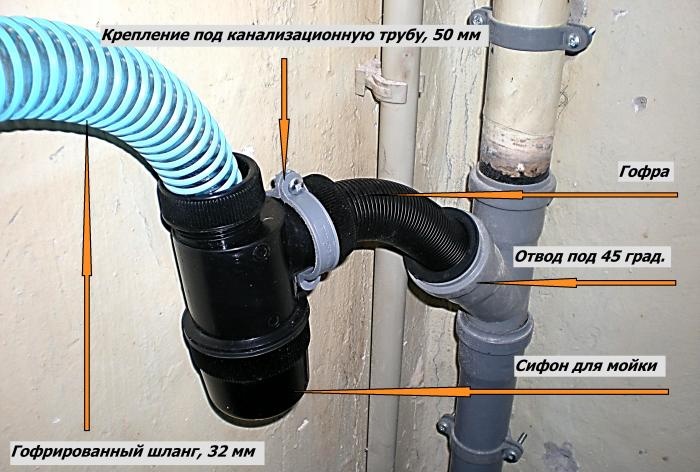
The water discharge system includes the following elements:
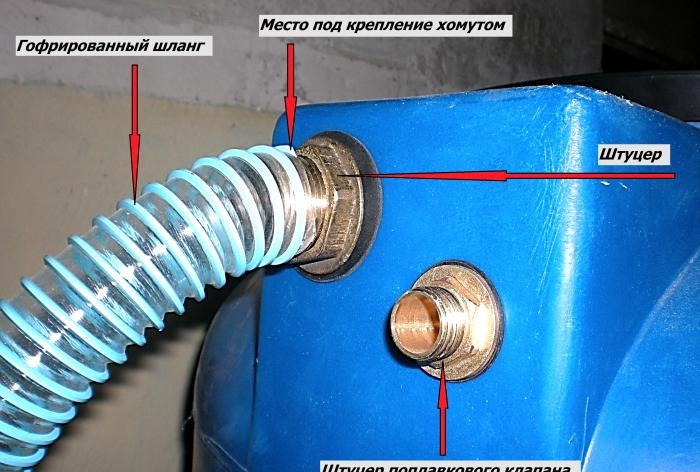
- 1. Brass fitting for the tank, with a nut and two rubber gaskets, 1 inch in diameter.
- 2. Corrugated hose, diameter 32 mm.
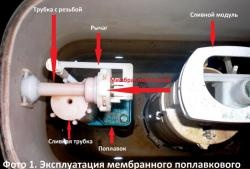
- 3. Siphon for washing.
- 4. Rubber seal for transition from a 32 mm pipe to a 50 mm sewer outlet.
- 5. Sewer outlet at 45 degrees.
- 6. Fastening for sewer pipe, 50mm.
- 7. Metal clamp.
- - pencil;
- - roulette;
- - drill;
- - feather drill, diameter 32 mm;
- - hacksaw for metal;
- - adjustable wrench;
- - drill for a 10 mm hammer drill;
- - hammer drill;
- - silicone.
Assembly order
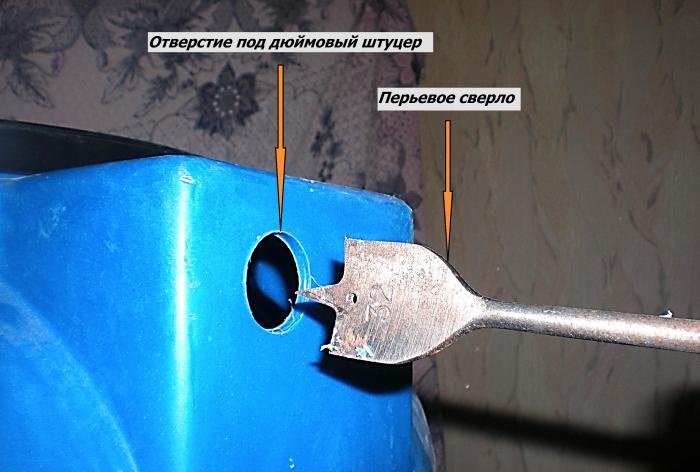
On the tank, in the upper part, above the extreme water level, which is set by the float valve, mark a hole for an inch fitting. It should fit snugly on both sides of the plastic part of the tank. Using a drill and a 32mm spade bit, carefully make a hole in the marked area. Insert an inch fitting with rubber bands into the resulting opening and securely fix it to the tank with an adjustable wrench.
Before installing a 45-degree outlet into the central riser, ask neighbors on the upper floors to temporarily stop draining water through this riser. If the outlet is installed not in the central drain line, but in its sleeve, then there is no need to warn anyone. On the installed sewer pipe, mark for installation of a branch and coupling with a diameter of 50 mm.Using a hacksaw, saw off the excess part from the riser and mount the listed elements on it. To prevent leakage between connections, before installing the drain, apply silicone evenly to the rubber seal.
Decide on the installation location of the siphon, its fastening, and make the appropriate markings. We fix the elbow to the wall using a fastening for a 50 mm sewer pipe. In the marked place, using a drill and a hammer drill, make a hole in the wall. Drive a plastic dowel into it and secure the mount. Decide on the long siphon corrugation that will be inserted into the outlet. Cut off the unnecessary part from it. Put a rubber transition on the part that will be installed in the sewer and mount it into the outlet. Use a 50 mm fastener to secure the drain elbow to the wall.
Place the tank in its position. Measure the length from the fitting to the middle of the siphon. According to the obtained values, cut off the corrugated hose. Secure the measured part of the hose, one side of it, to the fitting with a metal clamp, insert the other end into the drain elbow and tighten it with a plastic siphon nut.
This completes the assembly of the emergency drain. All connections are tight and of high quality, which guarantees the mandatory drainage of excess water.