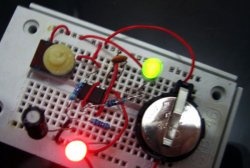
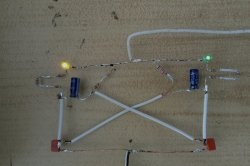
Do it yourself
Life hacks, master classes, useful tips, recipes.
home » Electronics » Simple circuits » A simple tester for checking radio elements
Greetings, dear friends! In this article I will show and tell you how to make a very simple tester for checking radio components such as diodes, transistors, capacitors, LEDs, incandescent lamps, inductors and much more. Beginner radio amateurs will especially like this tester. Although, it is so convenient that experienced radio amateurs still use it to this day.

Tester circuit


A simple tester for checking radio elements

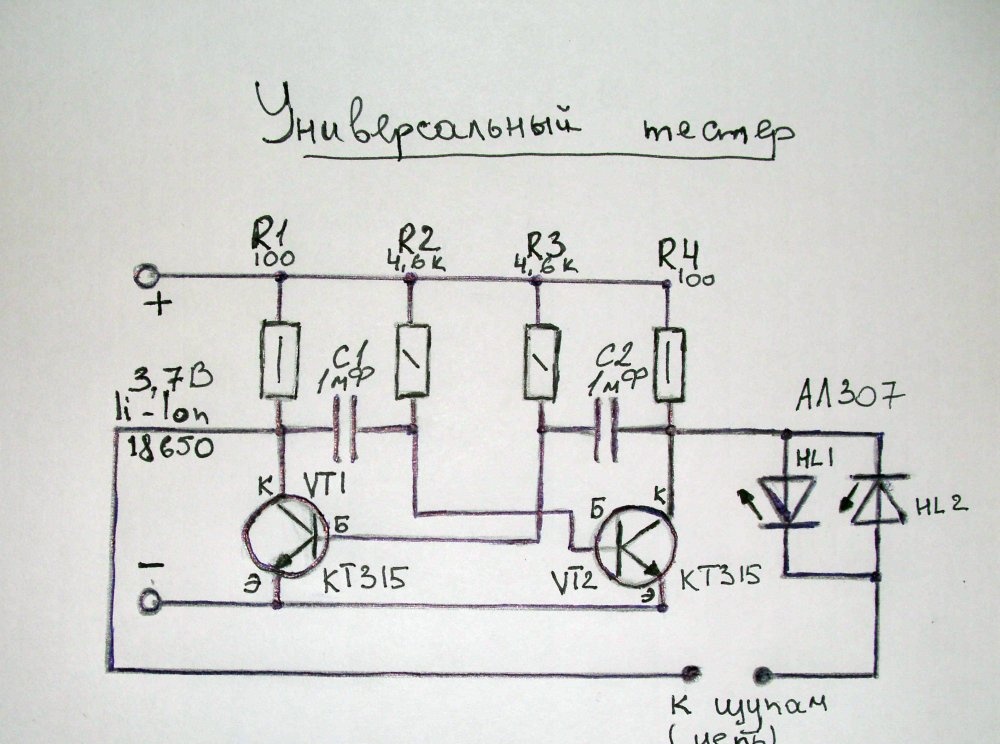
The tester contains a minimum number of elements that even novice radio amateurs will definitely find in their household. The entire circuit is essentially one multivibrator assembled using transistors. It generates rectangular pulses. The controlled circuit is connected to the arms of the multivibrator in series with two LEDs, counter-parallel. As a result, the circuit under test is tested with alternating current.

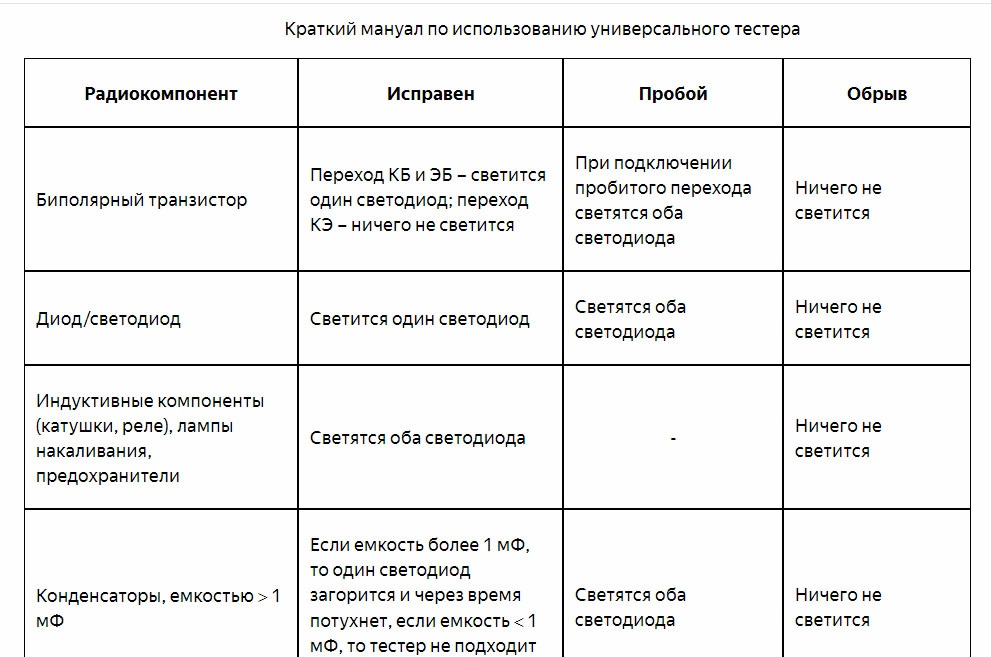
Operating principle of the tester for checking radio components


An alternating current is removed from the working multivibrator, approximately equal in amplitude to the power source. Initially LEDs do not light up because the circuit is open. But if you close the probes, then alternating current will flow through LEDs. At this time through LEDs an alternating current with a frequency of approximately 300 Hz will flow. As a result of back-to-back connection LEDs will flash alternately, but due to the high generation frequency this will not be visible to the human eye, but it will be seen that both LEDs are simply glowing at the same time.
What does this give? - You ask. For example, if you connect a diode to the probes, only one LED will light up, since the alternating current will flow only after one period. As a result, it will immediately be clear that the connected diode is working. The same thing is observed when checking transistor transitions.
The main convenience of this tester is that you can immediately see whether the diode junction is working or not. There is no need to turn the elements over to match the polarity of the tester, as in a conventional multimeter. This gives a huge advantage when testing a large number of radio elements, and is generally very convenient.
You can also check other elements or circuits for breakdown or breakage.
A simple tester for checking radio elements

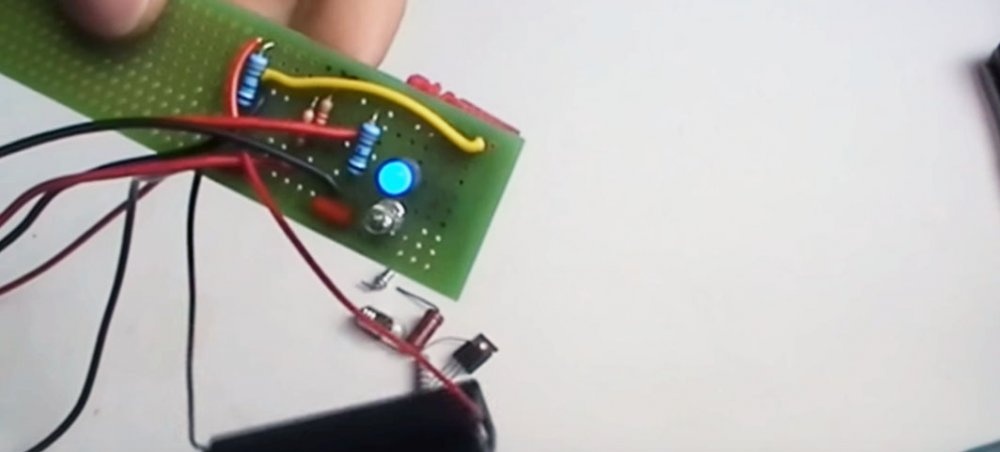
The tester can be assembled on a board or mounted. It is better to take LEDs of different colors so that the work can be clearly seen visually.
A simple tester for checking radio elements

Also, using this simple device, you can quickly determine where the cathode and anode of an unknown diode are. But to do this, you need to mark the location on the tester LEDs.
For power, I used a 3.7 V lithium-ion battery. But you can take 2-3 1.5 V “pinky” batteries connected in series.
In general, this is a very necessary thing. I recommend that you repeat this simple device. And you are guaranteed ease of use, since in most cases you need to determine the serviceability of the radio element, and not its parameters.

Watch a video on working with a tester to check radio elements


come back
Comment
  • bowtiesmilelaughingblushsmileyrelaxed relaxedsmirk
    heart_eyeskissing_heartkissing_closed_eyesflushedrelievedsatisfiedgrin
    winkstuck_out_tongue_winking_eyestuck_out_tongue_closed_eyesgrinningkissingstuck_out_tonguesleeping
    worriedfrowninganguishedopen_mouthgrimacingconfusedhushed
    expressionlessunamusedsweat_smilesweatdisappointed_relievedwearypassive
    disappointedconfoundedfearfulcold_sweatperseverecrysob
    joyastonishedscreamtired_faceangryragetriumph
    sleepyyummasksunglassesdizzy_faceimpsmiling_imp
    neutral_faceno_mouthinnocent
3+three=
Comments (5)
  1. Guest Andrey
    #1 Guest Andrey Guests 13 December 2017 19:59
    1
    capacitor what voltage
    1. feelloff
      #2 feelloff Guests December 14, 2017 07:33
      2
      A capacitor for any voltage above 3.7 V. That is, suitable for 16 and 25 and higher.
  2. Guest
    #3 Guest Guests 27 February 2018 15:53
    1
    Instead of a 3.7 V battery, can you connect a 5V 5000 mAh?
  3. Guest Alexey
    #4 Guest Alexey Guests 28 November 2018 20:41
    0
    When checking LED the indicators did not light up, but the light came on itself Light-emitting diode)
  4. Victor
    #5 Victor Guests February 20, 2021 09:57
    0
    Is it possible to add one more terminal for the base of the transistor being tested?

How to make a mini soldering iron from a resistor

What to do if the washing machine jumps during the spin cycle

How to make a garden path from wild stone and without concrete

LED acoustic flasher

«Do it yourself - with your own hands» - a site of interesting homemade products made from scrap materials and items at home. Step-by-step master classes with photos and descriptions, technologies, life hacks - everything a real master or just a craftsman needs for needlework. Crafts of any complexity, a large selection of directions and ideas for creativity.

We recommend reading

Washing machine error codes