Do it yourself
Life hacks, master classes, useful tips, recipes.
home » Handicraft techniques » Patchwork » Patchwork style pillowcase with embroidery elements
Beautiful things always please the eye. Homemade things are especially pleasant to the soul. They are unique in that the soul of the person who created them is embedded in them. Naturally, many people want to make everything that surrounds their child more convenient and beautiful. After all, you want to give your children the best. At the same time, you want the item to be not just beautiful, but also unique, not like the others. In this case, the solution would be to create things of various themes with your own hands. You will definitely not find an exact copy of a handicraft item anywhere.
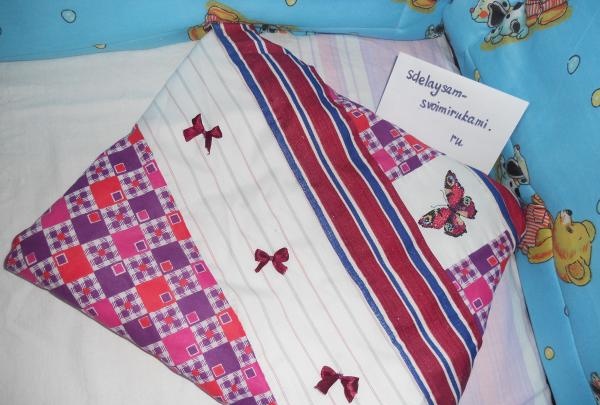
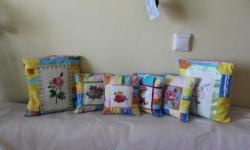
One of the options for decorating a children's room is creating bedding for a child. This master class describes the process of creating a beautiful patchwork style pillowcase with an embroidery element for a baby pillow.

For this you need:
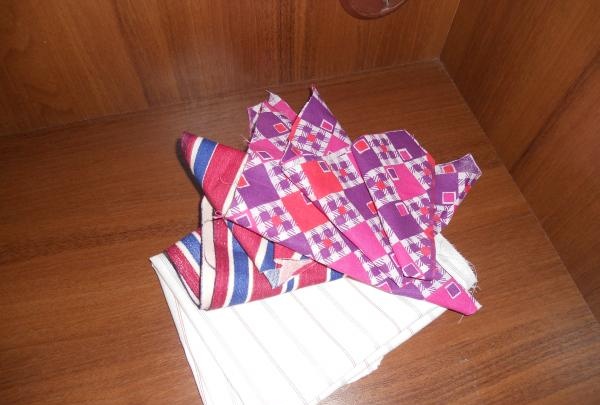
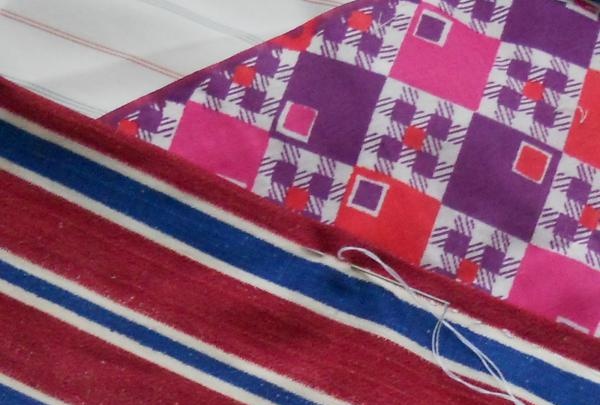
- base fabric, plain or with a pattern (40x70 cm);
- several small pieces of fabric with different designs or patterns of approximately the same theme or color scheme;
- satin ribbon to match the pattern of the fabric cuts (20-30 cm);
- decorative insert -embroidery (if you don’t have it, you can take a piece of fabric with a bright, catchy pattern);
- threads to match the base fabric or to match the additional fabrics;
- sewing needle.

Patchwork style pillowcase with embroidery elements


There are several ways to sew things in the patchwork style. This master class will describe a method in which fabrics will not just be stitched together, but sewn onto a base. This is the easiest way.
First, you need to think through a sketch of the future pillowcase, the location of the fabric scraps and decorative elements on the base. It's best to draw it on paper. Then cut out the necessary elements from the fabric and decide on the order of sewing them.


For convenience, some elements can be fastened with temporary threads, which will subsequently stretch out as the elements are sewn together.
The first piece to be sewn onto the base is a patch with an embroidered element or a pattern - a print. Then the remaining elements are sewn according to the previously planned sequence. The assembled elements are sewn together using a blind seam or a “back needle” seam. You can also sew them together using a sewing machine.


After the elements are sewn, you need to sew decorative bows onto the base. They are made from ribbon: a ribbon is tied to a pencil and a bow is formed, which is removed from the pencil and fixed with a thread in the area of ​​the knot.
After the front part is completely formed, it is sewn from the wrong side to the back of the pillowcase. Then the pillowcase is turned right side out, ironed and becomes completely ready for use.

come back
Comment
  • bowtiesmilelaughingblushsmileyrelaxed relaxedsmirk
    heart_eyeskissing_heartkissing_closed_eyesflushedrelievedsatisfiedgrin
    winkstuck_out_tongue_winking_eyestuck_out_tongue_closed_eyesgrinningkissingstuck_out_tonguesleeping
    worriedfrowninganguishedopen_mouthgrimacingconfusedhushed
    expressionlessunamusedsweat_smilesweatdisappointed_relievedwearypassive
    disappointedconfoundedfearfulcold_sweatperseverecrysob
    joyastonishedscreamtired_faceangryragetriumph
    sleepyyummasksunglassesdizzy_faceimpsmiling_imp
    neutral_faceno_mouthinnocent
3+three=
Comments (3)
  1. _SuNNy_
    #1 _SuNNy_ Guests 7 August 2017 11:16
    0
    It turned out to be a very stylish decorative element. In addition, all leftovers and scraps of fabric can be turned into a beautiful thing. I especially liked the bows - it would have been boring without them) Thanks for the idea and the master class!
  2. Svetlaia
    #2 Svetlaia Guests August 8, 2017 06:09
    0
    The idea is interesting. I'm also tired of the faceless, boring pillowcases. And it’s cute and creates the coziness that’s missing
  3. master1959
    #3 master1959 Guests 28 August 2017 21:36
    0
    At first I thought that the butterfly was made of parts. But no. It would be more interesting with a butterfly.

Harvesting for the winter - Green peas | Do it yourself

Black lemonade | Do it yourself

Various | Page 28 | Do it yourself

5 ways to unscrew the oil filter

«Do it yourself - with your own hands» - a site of interesting homemade products made from scrap materials and items at home. Step-by-step master classes with photos and descriptions, technologies, life hacks - everything a real master or just a craftsman needs for needlework. Crafts of any complexity, a large selection of directions and ideas for creativity.

We recommend reading

Washing machine error codes