Sitting at the computer in full creative process or playing a game, I was often distracted by my faithful dog with his barking, I had to tear my butt off my favorite chair, go out into the yard and see who was there. It turns out that the postman just walked by and put the press in the box, or the children ran noisily past the yard. In general, there was no need to worry. So the idea came to look over the fence, without taking your eyes off the monitor, with one click of the mouse.
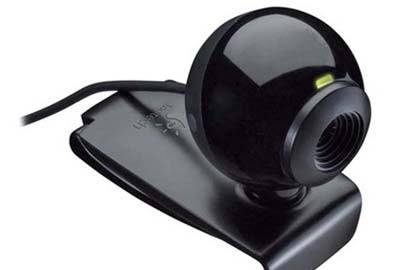
A webcam is perfect for this task. Firstly, it’s cheap compared to other video surveillance systems, and secondly, you don’t need to install any additional equipment. The driver that comes with the camera has a fairly good program that allows you to virtually rotate the camera at a certain angle horizontally and vertically, and even flip the image. You can record video to your hard drive or take photos. Brightness, contrast and color are also adjustable. This helps a lot in adjusting the image depending on the lighting outside and the time of day.But in the dark the camera is as blind as a mole, but this can be corrected if you install additional lighting in the area being viewed.
The main difficulty was extending the camera cable, because I couldn’t buy such a long USB cable. And also in the manufacture of a protective box and installation of a video camera in the right place.
Let's start with the wire. In order to lengthen the cable, we coolly cut it in half, between the camera and the USB plug, and remove a couple of centimeters of the protective sheath on both ends of the wire. And we see four veins there, and even braided. Hooray! They are different colors, they are lighter. And that means we need five wires of the required length. Be sure to carefully measure the distance from the intended installation location of the camera to your computer; you should try to keep the wire as short as possible.
I don’t know how much the braided screen affects the image quality, but my extension cord turned out to be ten meters, without a screen. I do not observe any extraneous interference or deterioration in image quality. It is advisable to take the wires as thin as possible, but always insulated. Enameled winding is not suitable for these purposes. I found a telephone cable with twenty thin colored wires. I had to carefully cut the protective shell and remove the five necessary wires. It’s good, of course, if the wires are of different colors, but you can also have the same color... It’s just that in this case they will need to be tested so as not to confuse anything.
We lay the cable by passing it through the holes drilled in the walls of your home. And already on our desktop we solder the USB plug with the corresponding colors recorded and carefully isolate all soldering points. You can turn it on to check the functionality of the loop.
It should be taken into account that there is a large difference in lighting indoors and outdoors.Therefore, after the first turn on, it may seem that nothing is working. There is no need to panic, especially if you are sure that there is nothing wrong with the wires. You need to open the settings in the program and adjust the brightness or change the checkboxes. The program was in English, I’m not good at it, so I used the stick method, and success came.
When the picture appears, you can move on. The final setup will need to be repeated after installing the outdoor webcam in place.
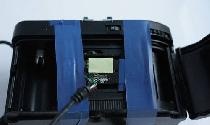
The webcam is designed to work indoors, so it is necessary to protect it from atmospheric influences. You can be creative yourself, but for this I used a piece of a plastic bottle. It may not be aesthetically pleasing, but as the hero Lyolik said, it is cheap, reliable and practical. For those who decided to follow my path, we cut a 1.5 liter bottle in half, we will need a half with a bottom. The design of the protective casing – boxing – is clear from the photograph.
Yes, and another main detail is the sun visor. It must be made from light-proof material so that direct sunlight does not enter the camera lens under any circumstances. I used rubber from a car inner tube. We wrap our camera with a strip of rubber so that a visor is formed about four centimeters from the lens, and insert it into our bottle. If the camera stand gets in the way, you can make a cut in the bottle; you can also pass the cable through this cut. Only in the future you need to install the camera with this cut down. The camera should be located above the observed object, and tilted with the bottom up and the lens down. This will prevent precipitation from getting on the camera. I have a solid fence, two meters high.The camera is installed at a height of two and a half meters and one and a half meters away from the gate and 30 cm deep into the yard. After installation, you will need to adjust the program again. The picture is certainly not Hollywood, but the people are quite recognizable by sight.
I’ve had this “toy” for two years now, and it works in the summer heat, but here it’s no joke, above 40 C in the shade, especially since the camera hangs in the sun and in winter frosts of -20, it can withstand it!
Yuri Yatsenko