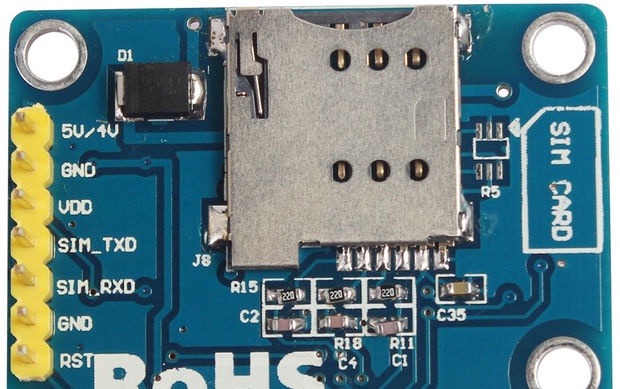
SIM800L V2.0 GSM/GPRS is a quad-band GSM/GPRS module compatible with Arduino. The module is used to implement GSM (calls and SMS) and GPRS functions. The advantage of this module is the TTL interface, which has a voltage of 5V, which allows you to directly connect it to Arduino or any other system with a 5V supply voltage. Most GSM/GPRS modules on the market require regulator connections or level conversion, while in SIM800L V.2 GSM/GPRS does not require additional interface level conversion circuits.
Let's give an example of a project using SIM800L V.2 GSM/GPRS. The point of the project is to control switches using an SMS controller. You can easily turn on and off most household appliances in the house, such as a llama, a fan, and so on.
Characteristics of the SIM800L V.2 GSM/GPRS module
Below are all the technical characteristics of the SIM800L V.2 GSM/GPRS module:
- TTL serial interface compatible with 3.3V and 5V Arduino compatible microcontrollers.
- The SIM800L module has a TTL serial interface.
- Antenna connection plug.
- Network support: four bands 850/900/1800/1900 MHz, capable of making calls, SMS and data transfers with significantly reduced battery consumption.
- VDD TTL UART interface, so you can directly connect MCU such as 51MCU, ARM or MSP430.The VDD plug is used to match the TTL voltage.
- Model: SIMCOM SIM800L
- Operating voltage: from 3.7V to 5V;
- dimensions: 40mm x 28mm x 3mm
- GPRS multislot class 12/10
- GPRS packet service class B
- Complies with GSM phase 2/2+
- Class 4 (2 Watt @ 850/900 MHz)
- Class 1 (1Watt @ 1800/1900MHz)
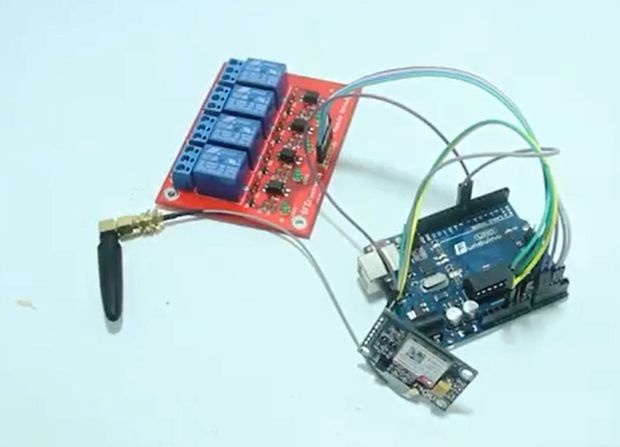
Necessary materials
You'll need:
1. SIM800L V.2 GSM/GPRS module.
2. Arduino Uno.
3. 4 Channel 5V Relay Module.
4. Wires - jumpers.
5. Power supply 5V.
(Links active to the store for purchase)
Assembly and configuration
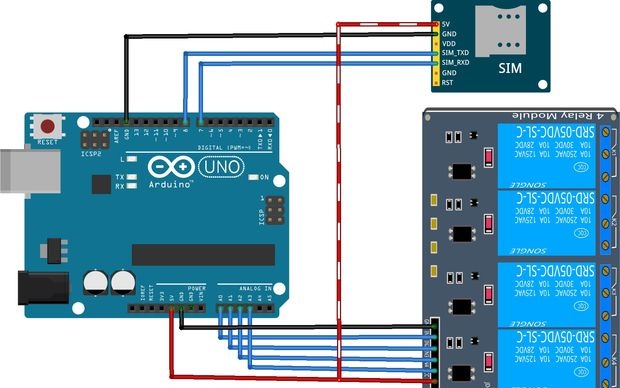
Once you have connected all the components, create a program and then upload it to your Arduino. But first, you must install the GPRS library, which you can download:
gprs.zip
[28.02 Kb] (downloads: 887)
Program code for Arduino

Once you have connected your SIM800L, 4 channel relay module and Arduino to your computer, enter the code below and you are done.
#include
#include
#define TIMEOUT 5000
#define ACTIVE LOW
#define OFF HIGH

byte Relay[] = {A0,A1,A2,A3};
byte StatRelay[4];
char buffNumber[20];
char currentLine[500] = "";
int currentLineIndex = 0;
bool nextLineIsMessage = false;
String replyNumber = "089510863958";
GPRS gprs;

void setup() {
for(int i=0; i < 4; i++) {
pinMode(Relay[i] , OUTPUT);
digitalWrite(Relay[i], MATI);
StatRelay[i] = MATI;
}

Serial.begin(9600);
while(!Serial);
Serial.println("Activate SIM800L V2 >>> Automatically Read SMS");
gprs.preInit();
delay(1000);
while (0 != gprs.init()) {
delay(1000);
Serial.print("init errorrn");
}

// Manage message to mode ASCII
if (0 != gprs.sendCmdAndWaitForResp("AT+CMGF=1rn", "OK", TIMEOUT)) {
ERROR("ERROR:CNMI");
return;
}
// Read Incoming SMS
if (0 != gprs.sendCmdAndWaitForResp("AT+CNMI=1,2,0,0,0rn", "OK", TIMEOUT)) {
ERROR("ERROR:CNMI");
return;
}
int pjg = replyNumber.length() + 1;
buffNumber[pjg];
replyNumber.toCharArray(buffNumber,pjg);
Serial.print("Send reply to number => ");
Serial.println(buffNumber);
Serial.println("Initialization Done");
Serial.println("============================================================ ================");
}

void loop() {
// Change status Relay ON / OFF
for(int i=0; i < 4; i++) {
digitalWrite(Relay[i], StatRelay[i]);
}

// If there is input data from SIM800
if (gprs.serialSIM800.available()) {
char lastCharRead = gprs.serialSIM800.read();

// Save all data on lastCharRead, then if there is r or n, as a final signal of incoming message
if (lastCharRead == 'r' || lastCharRead == 'n') {
String lastLine = String(currentLine);

// If the last message +CMT indicates new message arrive
if (lastLine.startsWith("+CMT:")) {
Serial.println(lastLine);
nextLineIsMessage = true;
} else if (lastLine.length() > 0) {
if (nextLineIsMessage) {
Serial.println(lastLine);

// ==================================================== ================>> Function of Relay Controller

//Relay 1 Controller

if (lastLine.indexOf("Relay 1 ON") >= 0) {
StatRelay[0] = AKTIF;
Serial.print("Reply====>>>> ");
Serial.println("Relay 1 Status Active");
gprs.sendSMS(buffNumber, "Relay 1 Status Active");
}

else if (lastLine.indexOf("Relay 1 OFF") >= 0) {
StatRelay[0] = MATI;
Serial.print("Reply====>>>> ");
Serial.println("Relay 1 Status Off");
gprs.sendSMS(buffNumber, "Relay 1 Status Off");
}

//Relay 2 Controller

if (lastLine.indexOf("Relay 2 ON") >= 0) {
StatRelay[1] = AKTIF;
Serial.print("Reply====>>>> ");
Serial.println("Relay 2 Status Active");
gprs.sendSMS(buffNumber, "Relay 2 Status Active");
}
else if (lastLine.indexOf("Relay 2 OFF") >= 0) {
StatRelay[1] = MATI;
Serial.print("Reply====>>>> ");
Serial.println("Relay 2 Status Off");
gprs.sendSMS(buffNumber, "Relay 2 Status Off");
}

//Relay 3 Controller
if (lastLine.indexOf("Relay 3 ON") >= 0) {
StatRelay[2] = AKTIF;
Serial.print("Reply====>>>> ");
Serial.println("Relay 3 Status Active");
gprs.sendSMS(buffNumber, "Relay 3 Status Active");
}
else if (lastLine.indexOf("Relay 3 OFF") >= 0) {
StatRelay[2] = MATI;
Serial.print("Reply====>>>> ");
Serial.println("Relay 3 Status Off");
gprs.sendSMS(buffNumber, "Relay 3 Status Off");
}

//Relay 4 Controller
if (lastLine.indexOf("Relay 4 ON") >= 0) {
StatRelay[3] = AKTIF;
Serial.print("Reply====>>>> ");
Serial.println("Relay 4 Status Active");
gprs.sendSMS(buffNumber, "Relay 1 Status Active");
}
else if (lastLine.indexOf("Relay 4 OFF") >= 0) {
StatRelay[3] = MATI;
Serial.print("Reply====>>>> ");
Serial.println("Relay 4 Status Off");
gprs.sendSMS(buffNumber, "Relay 4 Status Off");
}
nextLineIsMessage = false;
}

// ==================================================== ===================>>

}
//Clear char array for next line of read
for ( int i = 0; i < sizeof(currentLine); ++i ) {
currentLine[i] = (char)0;
}
currentLineIndex = 0;
}
else {
currentLine[currentLineIndex++] = lastCharRead;
}
}
}
Device check
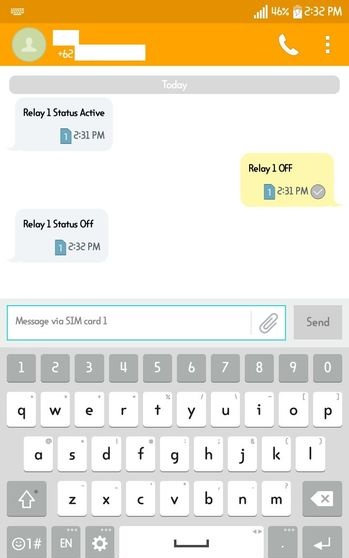
The tool works by sending an SMS to the SIM800L with a specific sequence of characters. For example, to turn on relay 1, use the “Relay 1 ON” command, and to turn it off, use the “Relay 1 OFF” command. For the remaining relays, the commands are almost the same, except for the sequence number of each relay that you want to influence. After automatically sending the message, SIM800 will send a response in the form of a message about the status of each SIM card.
Video of assembly, configuration and testing of the device
Original article in English