Do it yourself
Life hacks, master classes, useful tips, recipes.
home » Electronics » DIY electronics » 10 Watt LED lamp
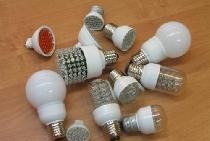
LEDs can be very effective and economical in long term use. 10 watt LED bulbs can replace a 100 watt incandescent bulb or a 30 watt compact fluorescent bulb. Despite the relatively high initial cost compared to other types of lamps, your electricity bill can be significantly reduced if you use these LED lamps yourself.

Here I will show you how to make your own stylish 10 Watt LED light.
 
 
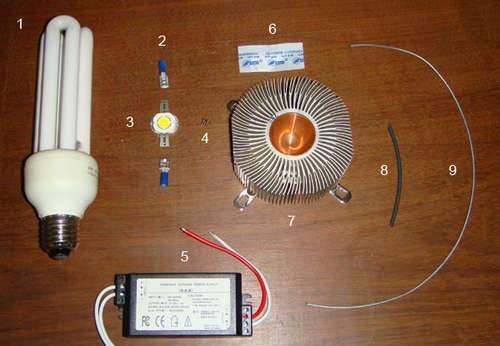
Necessary materials.

We will need:

1. Base from a burnt-out energy-saving lamp.

2. Two grips (to connect to the LED);

3. Powerful ten watt Light-emitting diode, color of your choice;

4. Two small screws;

5. One ten watt LED driver;

6. Thermal paste;

7. Radiator from video card;

8. Heat shrink tube (or insulating tape);

9. wires with a cross section of 2 mm.

10. Drilling machine.


First of all, we need to disassemble the old or burnt-out energy-saving lamp. Be careful not to damage the glass flask. Otherwise, mercury gas, which is very harmful to health, will come out of it.
 

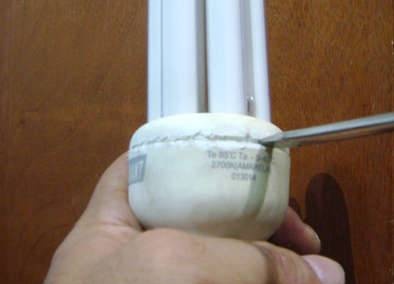
We only need the part of the case with the base.Let's cut off the leads from the board going to the base and solder our own, coming from the driver LED, behind which we insulate with heat-shrinkable tubes.


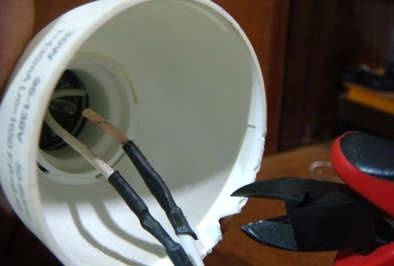
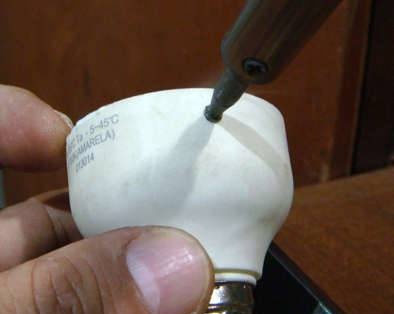
Using a soldering iron, we will make a couple of holes for the wire that will hold the entire structure.


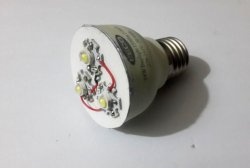
Next, in the center of the radiator (where the video card processor previously touched), drill two holes for mounting LED and cut the thread.

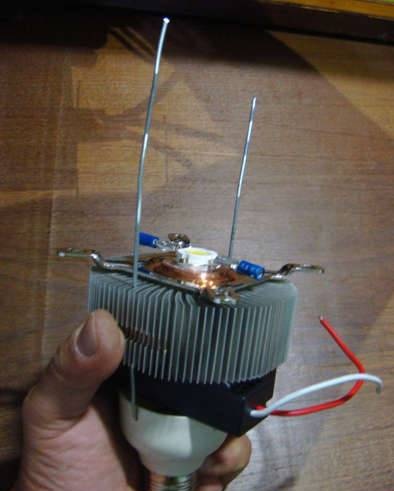
We plant Light-emitting diode. To do this, lubricate both surfaces with thermal paste and tightly screw the LED to the radiators.


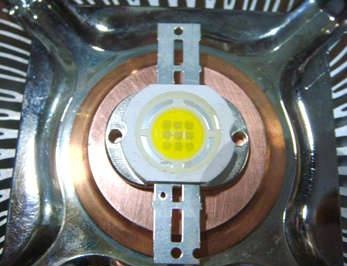
Then we take the terminals, crimp them, and connect them to the LED, observing the polarity.
 
Let's check. Some Chinese drivers slow down by about 3 seconds, so if the LED does not light up immediately, wait a little.

Don't even think about looking at the LED when it's on. The light intensity is very strong and can harm your eyes!
 
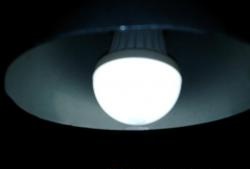
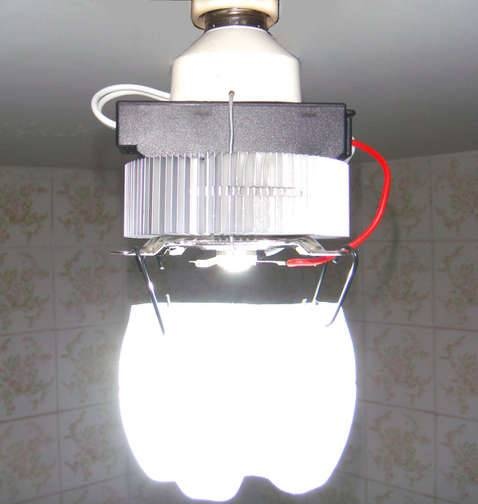
If everything works, we assemble the lamp into a single whole. As in the picture.


Diffuser.

The LED is very bright and casts harsh shadows. You can make the light smoother and softer using a homemade diffuser.

Cut out the bottom of a two-liter plastic bottle and sand it on all sides to make it completely opaque to direct light. Make four holes and attach it to the radiator with wire. See photo.


By making this lamp you will not only save your money, but also make our planet cleaner!

come back
Comment
  • bowtiesmilelaughingblushsmileyrelaxed relaxedsmirk
    heart_eyeskissing_heartkissing_closed_eyesflushedrelievedsatisfiedgrin
    winkstuck_out_tongue_winking_eyestuck_out_tongue_closed_eyesgrinningkissingstuck_out_tonguesleeping
    worriedfrowninganguishedopen_mouthgrimacingconfusedhushed
    expressionlessunamusedsweat_smilesweatdisappointed_relievedwearypassive
    disappointedconfoundedfearfulcold_sweatperseverecrysob
    joyastonishedscreamtired_faceangryragetriumph
    sleepyyummasksunglassesdizzy_faceimpsmiling_imp
    neutral_faceno_mouthinnocent
3+three=
Comments (21)
  1. Veent
    #1 Veent Guests 3 April 2011 18:31
    0
    Yes, I heard that they are now planning the industrial development of such lamps, only as a cooling element is a Peltier element that costs about 1,500 thousand rubles, so you will have to pay for the savings sad
  2. vladimirsnc
    #2 vladimirsnc Guests 2 October 2011 15:05
    1
    Good afternoon Cool implementation of an LED lamp. I really want to make something like this, I have a few questions:
    1) What is a ten watt LED driver. Why is it needed, where and how much can you buy it?
    2) What are two grips? Wire or what?
    3) What did you use to cut the threads for fastening? LED?
    Thanks in advance for your answers!
  3. TRP
    #3 TRP Guests 20 October 2011 15:53
    2
    Yes, mercury vapor is harmful... just like vapor from plastic scorched with a soldering iron happy . It’s very stylish to see the bottom of a plastic bottle under the ceiling.
    Further questions:
    1) LED driver - power supply for LED
    2) From the photo you can see the grips - two stainless pieces of wire...
    3) The thread is cut with a tool called a tap... and before that a hole is drilled.
    4) If you (vladimirsnc) ask such basic questions, I do not advise you to undertake destruction LED costing about $10... with an incandescent lamp the savings will be greater.
    happy
  4. soneks
    #4 soneks Guests 12 January 2012 16:23
    2
    Actually, out of respect for the readers, it would be nice to write the name of the LED driver.
    Moreover, the circuit is not cheap; the LED driver costs money.
    And finally, it would be nice to use Light-emitting diode “warm” glow, because the sharp white color irritates and strains the eyes, especially at home, and no light filter can save you from this.
    And lastly: I don’t recommend watching even weak ones Light-emitting diode (for example FLUX or “piranha”) - this spoils vision very strongly and quickly!
  5. NOTFRONT
    #5 NOTFRONT Guests 12 January 2012 17:45
    0
    What does respect have to do with it?! You should say thank you for showing this to you for free. Keep your recommendations to yourself, because they have little in common with common sense; this is not what the article is about.
    And the brand of the driver is not indicated due to the fact that it is selected purely individually to the LED and its power.
    1. Eldar
      #6 Eldar Guests January 8, 2019 12:00
      1
      said powerfully
  6. Veeh
    #7 Veeh Guests 13 January 2012 20:36
    4
    We were told how, roughly speaking, to stick Light-emitting diode into the socket. Everything else is designer entertainment. You might as well write an article about how to buy bread in a store.
  7. Levsha
    #8 Levsha Guests 14 March 2012 20:11
    0
    Quote: vladimirsnc
    children

    You can also install a current-limiting resistor instead of the driver. I personally did this. You can buy it at any radio store. that the driver that the resistor serves to limit the current for power supply LED. in general, so as not to burn it is not cheap Light-emitting diode.

    in order to Light-emitting diode secure it, drilled the holes with a drill, then screwed it on with self-tapping screws Light-emitting diode. IMPORTANT ! before installation LED Be sure to apply a little heat-conducting paste on the radiator! I personally just used wire to grab it. But from the photo you can see that there seems to be wire there. Good luck...
  8. Swarmer
    #9 Swarmer Guests October 1, 2013 07:04
    1
    A resistor can also be used. Then the diode's power supply will depend on network fluctuations.When the upper threshold increases (jumps in the network), the diode will simply burn out, since Ohm’s law has not been canceled. Does anyone like it when a light bulb sometimes flickers at a frequency of 50Hz? Are they lying? The driver creates stable voltage and current for the diode. Network fluctuations over a wide range do not cause light to flicker. And the diode supply frequency is tens of kilohertz, versus 50Hz, visible to the eye.
  9. Ndochp
    #10 Ndochp Guests October 26, 2013 07:33
    0
    Where do the kilohertz on the diode driver come from? in general, even a simple bridge with a conder gives almost constant voltage without flickering. A 3v zener diode in parallel with the LED will not allow the voltage to jump out more than necessary, so you can always agree with Ohm’s law. The price of all parts is pennies. I bought 260 sabilitrons for 5 bucks on DX, resistors are even cheaper, the bridge is either picked out or assembled from diodes for a dollar a pack.
  10. therion
    #11 therion Guests 16 November 2013 14:05
    1
    Tell me what to make the power supply for the cooler from? I removed the cooler from the power supply from the PC. Will your old phone charger work?

Men's Happy Birthday Box | Do it yourself

Do it yourself - crafts and master classes | Page 111

Tire column

How to make a cutter from an old spatula

«Do it yourself - with your own hands» - a site of interesting homemade products made from scrap materials and items at home. Step-by-step master classes with photos and descriptions, technologies, life hacks - everything a real master or just a craftsman needs for needlework. Crafts of any complexity, a large selection of directions and ideas for creativity.

We recommend reading

Washing machine error codes